
In this post, you will learn how to use a diecast for wargaming. A cheap and easy way to put vehicles on your gaming table. So let’s jump right into it!
The problem
Finding proper vehicles for your wargaming projects can be tough. In most cases you have to face three problems:
- proper size
- proper fit for your setting/timeline
- the price
Of course, there are suppliers, which offer vehicles, especially for miniature wargaming. You won’t face any sizing problems here. But their ranges are often focused on military vehicles or specific gaming systems. This can become a problem. As does the pricing. If you have to equip a whole gaming table, buying these specific vehicles can be expensive. But read on, there is a solution to your problem.
The solution – diecast for wargaming
Luckily there is a much broader market out there. Diecast. Yes, the Matchbox ones we played with when we were kids. They have some big advantages for our hobby.
- They are pretty inexpensive. Especially if you are buying them via marketplaces like eBay.
- They exist in a huge variety of styles and sizes
- They are durable
- They are easy to customize
Long story short, they are a great fit for our hobby. But of course there has to be a downside: they are still toys for kids, not miniatures for us. So in most cases, you have to customize them before they meet your requirements.
But actually, this is fun and I want to show you an example. So let’s start.
How to use a diecast for wargaming
I wanted to have a truck for our Pulp campaign in Darkest Africa. So I bought a couple of Die-cast on eBay. The one I use here is from the Power of the Press series by Matchbox. But any other model will work as well. So let’s start.

Die-cast models are very glossy out of the box. So you need to prime the whole piece and repaint it.
Mask the windshields, if you prefer them to stay transparent. I used masking tape for that. But any tape, which is easily removable will work for this task.
After that, prime the whole piece. I used The Army Painter primer in grey. But any other color will be fine too.

Beating up the truck
My truck should look beaten up and old. So I wanted to apply some rust effects.
To achieve that, paint the metal parts of the model in Vallejo Model Color Hull Red (985). After the paint dried up, apply your chipping medium. I recommend Vallejo Chipping Medium because it works well and it is easy to use.
Painting the truck
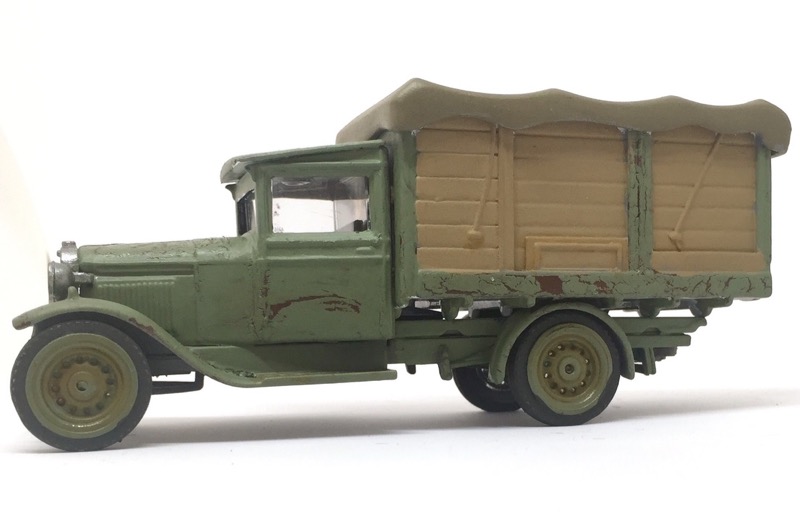
Now it is time to apply the base colors. I painted the metal parts in The Army Painter Goblin Green. The truck canvas in Vallejo Panzer Aces Canvas (314). Followed by the tires in Vallejo Model Color Black Grey (862) and the front chrome grill in Vallejo Model Color Oil y steel (865). Finally, the wooden parts in Vallejo Panzer Aces Old wood (310).
The finished truck


I hope this tutorial on How to use a diecast for wargaming is useful to you. Maybe you got some inspiration. So, grab some old Matchbox and start reusing them on the gaming table. And as always, if you have any questions put them down in the comments.
Happy Wargaming!
Very nice. I bought a couple of conversion kits from eBay and turned two ‘Yesteryear’ vans into locally sourced armoured cars for my 1920’s NW frontier project. They’d do, with a repaint, for 1940’s Home Guard.
Shops selling 2nd hand toys are good for vehicles. My local one dumps them in a crate for £1 each.
Sounds great. Do you have any pics of the vans after the conversion?
I have got pictures but how do I get them to here?
If you email me. I’ll send them.
Thanks for your comment. I’ll email you.